
Ever since Google got into the smartphone industry, I’ve been trying to find ways to take advantage of the free products they offer to better my business. When Gmail launched as a beta webmail application in 2004, it quickly set the standard for web-based email. After just over two years of a closed beta, Gmail went public in 2007 and has since evolved into the most widely used web-based email service with over 425 million active users in 2012!
With all that excitement, very few users know how to use Gmail to it’s extent. One of my favorite Gmail features is the ability to check third-party email accounts so they sync on all your devices! No more checking 10 email accounts manually – Google can take care of that for you! In order to begin you will need the following information:
• Your Gmail logon information
• Your Third-Party Email address (yourname@yourcompany.com)
• The username and password to check that email account
• The POP & SMTP Server Addresses
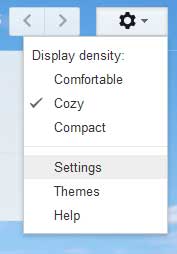
Step One: Let’s begin! Start by logging into your Gmail account then look in the top right corner for the gears icon. Select it and then click on “Settings”.
Gmail Settings Link
Step Two: When the settings have loaded, choose the “Accounts & Import” tab at the top.
Gmail Accounts & Import Tab
Step Three: Scroll down and you’ll see a section called “Check mail from other accounts”. In this section, click the link “Add a POP3 mail account you own”, which will open a new window.

Gmail “Check Mail From Other Accounts”
Step Four: In the pop-up the first question it will ask is for your email address. This is your third party email address. In my example, I use shea@welovetothink.com. Click next and you’ll get a bunch of fields. Don’t fret though – They are all easy! This is where you’ll need to enter your POP server address, username and password. You have a few other options which may or may not be necessary though I highly recommend choosing the “Label incoming messages” box and either create a label for this email account or assign it to an existing label. In this example, I will be assigning it to Think, L.L.C. This way, any time Gmail collects an email for shea@welovetothink.com, it will display this label in my inbox so I can decipher what is a work email vs a personal email. Once you are finished, choose Add Account and the window will close while Gmail checks the email on that account.
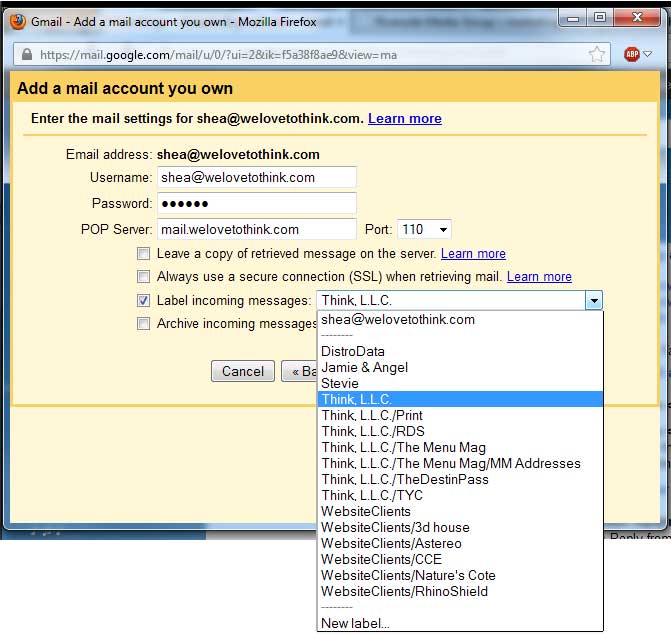
Gmail “Add a Mail Account You Own”
Step Five: Next is to set-up Gmail to be allowed to SEND email from your work account. Back in the “Accounts & Import” tab of the settings, a few spots above the other setting is “Send mail as”. Choose the “Add another email address you own. In the pop-up, it will ask for your email address (I use shea@welovetothink.com just like earlier) and chose next. On this next page you have two options: Send through Gmail or send through your SMTP. Personally I always send through my SMTP as some servers may look at your sent mail as spam if they bounce of Gmail first. When you send through your SMTP, it acts identical to if you were to send from outlook. But when you send through Gmail, it uses Gmail’s servers and sets up what is known as a ‘Reply-To’ header telling other servers how to get a response back to where it originated. A lot of spammers use this tactic, so it is a gamble to use. My honest thoughts are to stick with your SMTP server and never worry about it. Enter your settings and choose Save Changes. It will ask you for a pin code to verify that is your account, but you’ve already set up Gmail to check your email account so go back to your inbox and refresh so it receives the pin code. Enter it and you’re good to go!
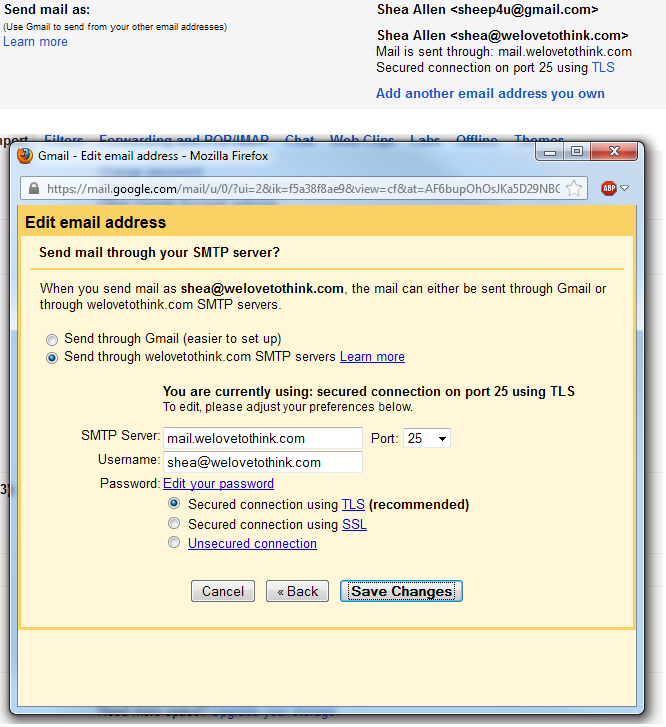
Gmail “Send Mail As”
Step Six: A few more things to note: Under the “Send mail as” section of the Accounts & Import tab there is an option “When replying to a message”. I choose Reply from the same address the message was sent to so if you receive a work email, your reply will come from your work email address.

Gmail “When Replying To A Message”
Personal VS. Work: As Gmail checks your work email account, depending on how you set up your labels, you should notice emails coming to your inbox with the work label. These labels sync through your phone, web, etc. so you’re never lost. Below you’ll see an email sent to the Gmail account (no label) and an email sent to my work account (blue labeled Think, L.L.C.).

Gmail Sample Inbox with Personal vs. Work Email
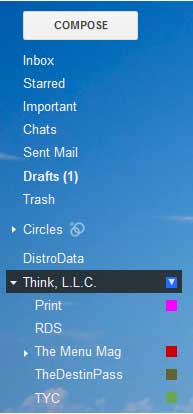
Gmail Labels: If you ever just want to see your work emails you can choose the label on the left side under all your folders.
Gmail Labels
Check Mail Now! That’s it! You’re all set up! The one important note to remember is Gmail doesn’t check your work account every few minutes. In fact, it’s usually about every 40-45 minutes depending on how many emails you get at a time. If you’re waiting on an email to come through, either click the Refresh button above your inbox or go back to the “Accounts & Import” tab of the settings, scroll down to the “Check mail from other accounts” area, find your email address and say “Check Mail Now”.
Gmail “Check Mail Now!”